This is the multi-page printable view of this section. Click here to print.
Kubernetes Service | AKS
- 1: Start & Stop AKS Cluster
- 2: Identity & Access Management (IAM)
- 3: Ingress Application Gateway
- 4: Ingress NGINX (Community)
- 5: Key Vault
- 6: Load Balancer
- 7: Storage
1 - Start & Stop AKS Cluster
How to Start and Stop the AKS Cluster
Note:
User node pools can be scaled to zero to reduce costs without stopping the Kubernetes service.Start & Stop:
- Navigate to your AKS service in the Azure portal
.
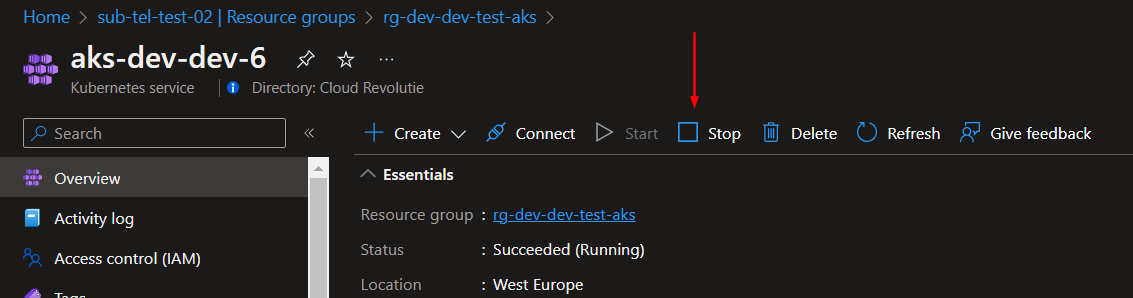
You can find the aks service in the resource group:rg-<environment>-<short company name>-<workload name>-akse.g. ‘rg-prod-tls-cmaas-aks’. - On the overview page, click on start/stop in the action menu on the top of the page.
It takes at least 5 minutes to start or stop an aks cluster.
Caution:
It is important that you don’t repeatedly start/stop your cluster. Repeatedly starting/stopping your cluster may result in errors. Once your cluster is stopped, you should wait 15-30 minutes before starting it up again.Reduce node count to zero:
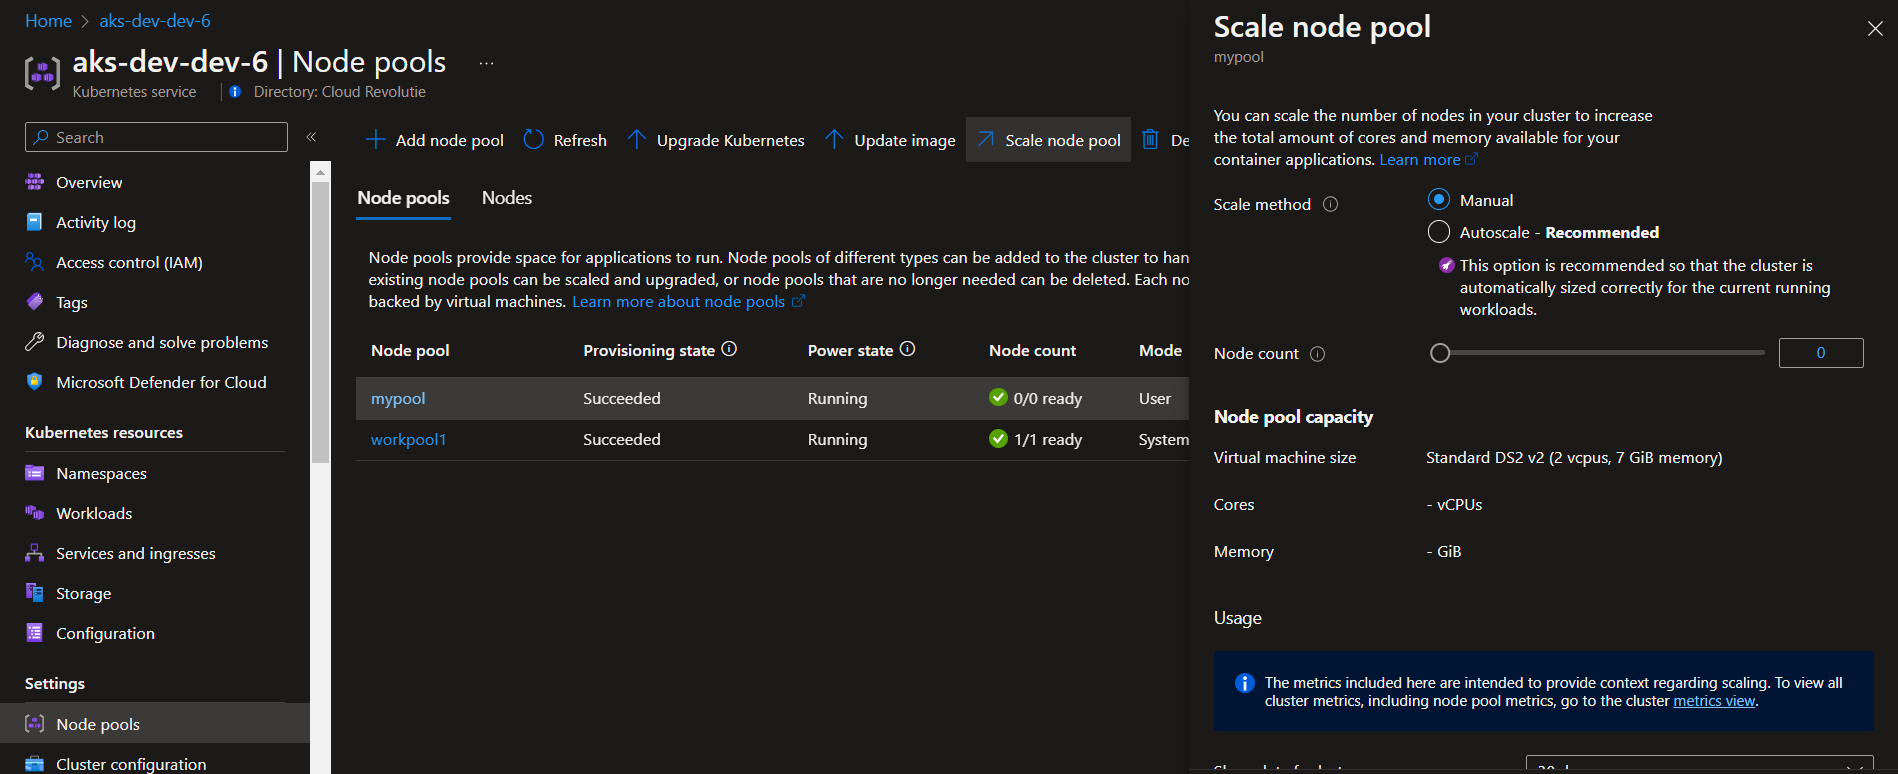
Unlike System node pools that always require running nodes, User node pools allow you to scale to 0
- Navigate to your AKS service in the Azure portal
.
You can find the aks service in the resource group:rg-<environment>-<short company name>-<workload name>-akse.g. ‘rg-prod-tls-cmaas-aks’. - In the navigation panel on the left, click on node pools.
- Select the user node pool you want to scale
- Click on Scale Node Pool
- Select Manual and set the Node Count to 0
2 - Identity & Access Management (IAM)
Introduction
This document outlines an approach for managing and controlling access to Azure Resources, AKS, and Kubernetes resources in a unified way.
AKS provides three different methods for authentication and authorization:
- Local accounts with Kubernetes RBAC
- Azure AD Authentication with Kubernetes RBAC
- Azure AD authentication with Azure RBAC
By default, we deploy the first option, where Azure AD is only used to retrieve the Kubernetes Cluster admin certificate. Authentication and authorization are handled by Kubernetes.
However, this approach requires managing identities and permissions in multiple systems. Users and admins receive a local X509 client certificate specific to the cluster they’re accessing. This certificate has a common name of “masterclient,” belongs to the “system:masters” group, and is bound to a cluster-admin role that grants full AKS cluster admin access. To add additional users, admins must manually create a certificate for each user signed by the cluster’s certificate authority.
The second option combines Azure AD Authentication with Kubernetes RBAC, allowing customers to use their Azure AD identity to authenticate to Kubernetes. Customers need to define Kubernetes roles and map them to Azure AD identities and security groups.
The third option is similar to the second, but now you can utilize Azure RBAC roles to authenticate en authorize identities accessing the Kubernetes cluster. With this option, customers can easily manage identity permissions within Kubernetes using Azure AD. Setting up an admin group is not necessary, as Azure RBAC can be used to grant identities admin access to a cluster.
Prerequisites
- Ensure you have the Azure CLI version 2.24.0 or later
- Ensure you have installed kubectl v1.18.3+
Limitations
- Requires Managed Azure AD integration.
- AKS-managed Azure AD integration can’t be disabled.
- Use kubectl v1.18.3+.
- If you have CRDs and are making custom role definitions, the only way to cover CRDs today is to provide Microsoft.ContainerService/managedClusters/*/read. AKS is working on providing more granular permissions for CRDs. For the remaining objects you can use the specific API Groups, for example: Microsoft.ContainerService/apps/deployments/read.
- New role assignments can take up to 5min to propagate and be updated by the authorization server.
- Requires the Azure AD tenant configured for authentication to be the same as the tenant for the subscription that holds the AKS cluster.
- if your organization uses conditional access policies to allow only compliant devices to authenticate with the company identities, make sure your administrator adds the kubernetes Azure AAD Server to the app exclusion list.
Getting Started
The remainder of this document outlines the steps required to integrate Azure AD with your AKS cluster and enable Azure RBAC. Following these instructions will enable you to manage Kubernetes identity access and permissions using Azure AD. You’ll also be able to create custom Kubernetes RBAC roles and map them to Azure AD users and security groups.
This guide begins by deploying the AD integration using option 2: “Azure AD Authentication with Kubernetes RBAC.” This option requires customers to create some necessary security groups. In the background, a Kubernetes admin role is created, which can be easily customized further.
Next, the guide enables Azure RBAC integration, which permits customers to use Azure RBAC roles alongside Kubernetes RBAC roles, offering greater flexibility in managing identity access and permissions within Kubernetes.
Enable Managed Azure AD integration
Prepare environment
Before enabling Azure AD authorization, you need to prepare your AD environment.
-
Create user groups (AKS Administrators, AKS Readers):
You will need two Azure AD groups for your cluster. To create these groups, navigate to your Azure Directory in the portal and follow these steps:- Create Administrator Group: The first group will be registered as an admin group in the cluster.
- Create Reader Group: The second group must be configured with reader permissions on the AKS cluster, using the following Azure AD roles:
ReaderGet access to subscription and see resources.Azure Kubernetes Service Cluster User RoleGet permissions to retrieve kubeconfigAzure Kubernetes Service RBAC ReaderGet reader permissions within kubernetes
-
Create an App registration with AKS reader permissions:
After deploying the Azure AD integration, CMaaS engineers will no longer be able to access the cluster. To provide customers with support, it is necessary for us to have at least reader permissions within the cluster. To grant access, create a new app registration and add it as a member of the AKS Reader group you just created.
Enable Azure AD integration
The next step is to connect the AKS cluster to Azure AD:
-
Enable Azure AD Authentication for the AKS CLuster: (This action cannot be reversed)
Enabling this step will allow you to use your company identities to access the AKS cluster.
Be sure to set your admin group to maintain access to your cluster.az aks update -g MyResourceGroup -n MyManagedCluster --enable-aad --aad-admin-group-object-ids <id-1> [--aad-tenant-id <id>]Info
Behind the scenes, to make the group an admin for the cluster, AKS will create a cluster role binding that assigns it a cluster role providing full admin access to the cluster. -
Enable Azure RBAC Authorization:
Enabling this step will allow you to use Azure AD to authorize company identities within your AKS cluster.az aks update --resource-group <resource-group> --name <cluster-name> --enable-azure-rbac
Disable Local Accounts
When deploying the AKS cluster, local accounts are enabled by default, even when enabling RBAC or Azure AD integration,
--admin access still exists as a non-auditable backdoor option. To address this, you can use the disable-local-accounts parameter to disable local accounts.
az aks update -g <resource-group> -n <cluster-name> --disable-local-accounts
Use Azure AD RBAC to access the AKS cluster
-
To ensure your Kubernetes management tools are up-to-date, run the following command:
az aks install-cli -
Retrieve kubernetes kubeconfig:
az aks get-credentials --resource-group myResourceGroup --name myAKSCluster --overwrite-existing -
After running a command, such as
kubectl get pods, you should receive an authentication prompt with Azure, similar to the following:kubectl get pods To sign in, use a web browser to open the page https://microsoft.com/devicelogin and enter the code B24ZD6FP8 to authenticate.
If your company sign-in flow is successful, and you have appropriate permissions, you should see the result of the command.
Troubleshoot sign-in
- If you encounter difficulties during authentication or notice that permissions are not being propagated,
try cleaning your .kube folder and try to authenticate again.
You can find the .kube folder located atC:\Users<USERNAME>\.kube.
However, be aware that by cleaning your .kube folder, you will lose access to any other Kubernetes instances that you have defined within that folder.
Use Azure RBAC for Kubernetes authorization
Roles can be assigned for the entire AKS cluster through either the Access Control (IAM) section of the cluster resource in the Azure portal or by using Azure CLI commands, as demonstrated below:
# Get your AKS Resource ID
AKS_ID=$(az aks show -g MyResourceGroup -n MyManagedCluster --query id -o tsv)
az role assignment create --role "Azure Kubernetes Service RBAC Admin" --assignee <AAD-ENTITY-ID> --scope $AKS_ID
where <AAD-ENTITY-ID> could be a username (for example, user@contoso.com
) or even the ClientID of a service principal.
You can also create role assignments scoped to a specific namespace within the cluster:
az role assignment create --role "Azure Kubernetes Service RBAC Reader" --assignee <AAD-ENTITY-ID> --scope $AKS_ID/namespaces/<namespace-name>
Today, role assignments scoped to namespaces need to be configured via Azure CLI.
Built-in Roles
AKS provides the following four built-in roles:
| Role | Description |
|---|---|
| Azure Kubernetes Service RBAC Reader | Allows read-only access to see most objects in a namespace. Doesn’t allow viewing roles or role bindings. Doesn’t allow viewing Secrets. Reading the Secrets contents enables access to ServiceAccount credentials in the namespace, which would allow API access as any ServiceAccount in the namespace (a form of privilege escalation). |
| Azure Kubernetes Service RBAC Writer | Allows read/write access to most objects in a namespace. Doesn’t allow viewing or modifying roles, or role bindings. Allows accessing Secrets and running pods as any ServiceAccount in the namespace, so it can be used to gain the API access levels of any ServiceAccount in the namespace. |
| Azure Kubernetes Service RBAC Admin | Allows admin access, intended to be granted within a namespace. Allows read/write access to most resources in a namespace (or cluster scope), including the ability to create roles and role bindings within the namespace. Doesn’t allow write access to resource quota or to the namespace itself. |
| Azure Kubernetes Service RBAC Cluster Admin | Allows super-user access to perform any action on any resource. Gives full control over every resource in the cluster and in all namespaces. |
Create custom role definitions
Optionally, you may choose to create your own role definition, which you can then assign as shown above.
For example, here is a sample role definition that allows a user to only read deployments and nothing else. You can check the full list of possible actions here.
To create this custom role definition, copy the JSON below into a file called deploy-view.json.
{
    "Name": "AKS Deployment Reader",
    "Description": "Lets you view all deployments in cluster/namespace.",
    "Actions": [],
    "NotActions": [],
    "DataActions": [
        "Microsoft.ContainerService/managedClusters/apps/deployments/read"
    ],
    "NotDataActions": [],
    "assignableScopes": [
        "/subscriptions/<YOUR SUBSCRIPTION ID>"
    ]
}
Replace <YOUR SUBSCRIPTION ID> by the ID from your subscription, which you can get by running:
az account show --query id -o tsv
Now we can create the role definition by running the below command from the folder where you saved deploy-view.json:
az role definition create --role-definition @deploy-view.json
Now that you have your role definition, you can assign it to a user or other identity by running:
az role assignment create --role "AKS Deployment Reader" --assignee <AAD-ENTITY-ID> --scope $AKS_ID
Use Kubernetes RBAC with Azure AD integration
In Kubernetes, Roles define the permissions to grant, and RoleBindings apply them to desired users or groups. These assignments can be applied to a given namespace, or across the entire cluster. If you need more control over access management, you can leverage Kubernetes RBAC and combine it with Azure RBAC. By creating custom Kubernetes roles and applying them to the desired Azure AD security groups, you can define fine-grained permissions, providing more flexibility and security.
Create Role
To create a Role for the dev namespace that grants full permissions to the namespace, you can use the following example. In production environments, you may want to specify more granular permissions for different users or groups.
Create a file named role-dev-namespace.yaml and paste the following YAML manifest:
kind: Role
apiVersion: rbac.authorization.k8s.io/v1
metadata:
  name: dev-user-full-access
  namespace: dev
rules:
- apiGroups: ["", "extensions", "apps"]
  resources: ["*"]
  verbs: ["*"]
- apiGroups: ["batch"]
  resources:
  - jobs
  - cronjobs
  verbs: ["*"]
Create the Role using the kubectl apply command and specify the filename of your YAML manifest.
kubectl apply -f role-dev-namespace.yaml
Create RoleBinding
To utilize the previously created Role, we must create a RoleBinding.
Create a file named rolebinding-dev-namespace.yaml and paste the YAML manifest shown below.
On the last line, replace groupObjectId with the group object ID of the desired Azure AD security group.
You can use an existing or create a new security group.
If you want to create the RoleBinding for a single user, specify kind: User and replace groupObjectId with the user principal name (UPN) in the sample below.
kind: RoleBinding
apiVersion: rbac.authorization.k8s.io/v1
metadata:
  name: dev-user-access
  namespace: dev
roleRef:
  apiGroup: rbac.authorization.k8s.io
  kind: Role
  name: dev-user-full-access
subjects:
- kind: Group
  namespace: dev
  name: <groupObjectId>
Create the RoleBinding using the kubectl apply command and specify the filename of your YAML manifest:
kubectl apply -f rolebinding-dev-namespace.yaml
3 - Ingress Application Gateway
Getting started
To create an ingress using the application gateway, use the following annotation:
kubernetes.io/ingress.class: azure/application-gateway
With annotations, you can configure the application gateway the way you need to get you service working. Annotations are optional but the most important ones are:
appgw.ingress.kubernetes.io/use-private-ip: <boolean>
Expose your service to the private ip, defaults to false.appgw.ingress.kubernetes.io/health-probe-path: <string>
This annotation allows specifically define target URI path to be used for AGW health probe.
Full Annotation List:
https://azure.github.io/application-gateway-kubernetes-ingress/annotations
Example ingress:
---
apiVersion: networking.k8s.io/v1
kind: Ingress
metadata:
  name: test-ingress
  annotations:
    kubernetes.io/ingress.class: azure/application-gateway
    appgw.ingress.kubernetes.io/use-private-ip: "true"  # Optional: force usage of private ip
    appgw.ingress.kubernetes.io/health-probe-path: "/api/" # Optional: Set healt probe path, defaults to /
spec:
  rules:
    - host: test.agic.contoso.com
      http:
        paths:
          - path: /
            backend:
              service:
                name: test-service
                port:
                  number: 80
            pathType: Prefix
TLS Certificates
Certificate stored in Kubernetes Secrets
-
Create Certificate and key
openssl req -newkey rsa:4096 \ -x509 \ -sha256 \ -days 3650 \ -nodes \ -out example.crt \ -keyout example.key -
Create Kubernetes Secret
kubectl create secret tls <secret-name> --key <path-to-key> --cert <path-to-cert> -
Configure Ingress
apiVersion: networking.k8s.io/v1
kind: Ingress
metadata:
name: test-ingress
annotations:
  kubernetes.io/ingress.class: azure/application-gateway
spec:
  tls:
    - secretName: <secret-name>
  rules:
    - http:
      paths:
        - backend:
          serviceName: frontend
          servicePort: 80
Certificate stored in Key Vault
-
Convert cert and key to pfx
openssl pkcs12 -export -in example.crt -inkey example.key -out example.pfx -
Upload pfx to key vault
az keyvault certificate import --vault-name <key-vault-name> -n example-cert -f example.pfx -
Deploy Secret Provider Class
apiVersion: secrets-store.csi.x-k8s.io/v1 kind: SecretProviderClass metadata: name: azure-tls spec: provider: azure secretObjects: # secretObjects defines the desired state of synced K8s secret objects - secretName: ingress-tls-csi type: kubernetes.io/tls data: - objectName: example-cert key: tls.key - objectName: example-cert key: tls.crt parameters: usePodIdentity: "false" useVMManagedIdentity: "true" userAssignedIdentityID: <client_id> keyvaultName: <key-vault-name> # the name of the AKV instance objects: | array: - | objectName: example-cert objectType: secret tenantId: <tenant-id> # the tenant ID of the AKV instance -
Configure Deployment
Add the secret class to the pod to provision the secret within the cluster.... containers: - image: docker.io/library/nginx:latest name: azure-files-pod-test ports: - containerPort: 80 protocol: TCP volumeMounts: - name: secrets-store-inline mountPath: "/mnt/secrets-store" readOnly: true volumes: - name: secrets-store-inline csi: driver: secrets-store.csi.k8s.io readOnly: true volumeAttributes: secretProviderClass: "azure-tls" -
Configure Ingress
Add the provisioned secret to the ingressapiVersion: networking.k8s.io/v1 kind: Ingress metadata: name: test-ingress annotations: kubernetes.io/ingress.class: azure/application-gateway spec: tls: - secretName: ingress-tls-csi rules: - http: paths: - path: / backend: service: name: test-service port: number: 80 pathType: Prefix
4 - Ingress NGINX (Community)
Introduction
In addition to the Application Gateway Ingress Controller (AGIC) the CMaaS customers can deploy an ingress controller of their choice. When choosing the AGIC the CMaaS team will ensure availability of the Aplication Gateway. When using a different ingress controller (e.g. NGINX or Traefik) the customer is responsible. In all cases the correct configuration and use of the ingress controller is the responsibility of the customer. This article is only an example on how to use the NGINX ingress controller. The customer should correctly configure the ingress controller to meet their needs.
An ingress controller is a piece of software that provides reverse proxy, configurable traffic routing, and TLS termination for Kubernetes services. Kubernetes ingress resources are used to configure the ingress rules and routes for individual Kubernetes services. When you use an ingress controller and ingress rules, a single IP address can be used to route traffic to multiple services in a Kubernetes cluster.
Note
There are two open source ingress controllers for Kubernetes based on Nginx: one is maintained by the Kubernetes community (kubernetes/ingress-nginx), and one is maintained by NGINX, Inc. (nginxinc/kubernetes-ingress). This article will be using the Kubernetes community ingress controller.Getting started
Install Helm and check your current kubernetes version to install the NGINX ingress controller on a supported version of Kubernetes. Make sure that you’re using the latest release of Helm and have access to the ingress-nginx Helm repository. The steps outlined in this article may not be compatible with previous versions of the Helm chart, NGINX ingress controller, or Kubernetes.
Connect to your aks cluster and continue to the next step.
Supported Versions table
Check the table on this page to know which version of NGINX is compatible with your kubernetes version.
Install the nginx ingress controller
Add Helm chart
helm repo add ingress-nginx https://kubernetes.github.io/ingress-nginx
helm repo update
Install Controller
To create a basic NGINX ingress controller without customizing the defaults, use the following example. The command will create the namespace if it not exists.
#!/usr/bin/bash

NAMESPACE=ingress-basic
CONTROLLER_TAG=<controller_version>  # e.g. v1.5.1

helm install ingress-nginx ingress-nginx/ingress-nginx `
  --create-namespace `
  --namespace testns `
  --set controller.service.annotations."service\.beta\.kubernetes\.io/azure-load-balancer-health-probe-request-path"=/healthz `
  --set controller.image.tag=$CONTROLLER_TAG
For more installation options see this page
Check the load balancer service
When the installation is complete, check the load balancer service by using kubectl get services.
kubectl get services --namespace ingress-basic -o wide -w ingress-nginx-controller
When the Kubernetes load balancer service is created for the NGINX ingress controller, an IP address is assigned under EXTERNAL-IP, as shown in the following example output:
NAME                       TYPE           CLUSTER-IP    EXTERNAL-IP     PORT(S)                      AGE   SELECTOR
ingress-nginx-controller   LoadBalancer   10.0.0.115   EXTERNAL-IP     80:30957/TCP,443:32414/TCP   1m   app.kubernetes.io/component=controller,app.kubernetes.io/instance=ingress-nginx,app.kubernetes.io/name=ingress-nginx
No ingress rules have been created yet, so the NGINX ingress controller’s default 404 page is displayed if you browse to the external IP address. Ingress rules are configured in the following steps.
Using the nginx ingress controller
To start using the NGINX ingress controller, create an ingress with the following parameter: ingressClassName: nginx
as shown in the example below.
Example Ingress
# Ingress
---
apiVersion: networking.k8s.io/v1
kind: Ingress
metadata:
  name: test-ingress
spec:
  ingressClassName: nginx
  rules:
    - host: test.agic.contoso.com
      http:
        paths:
          - path: /
            backend:
              service:
                name: test-service
                port:
                  number: 80
            pathType: Prefix
Test Pod Deployment
To make sure your pod is accessible trough NGINX, run the following command with your load balancer ip address:
# linux
curl -I -H 'test.agic.contoso.com' <publitc-ip-address>

# powershell
Invoke-WebRequest <publitc-ip-address> -Headers @{ host="test.agic.contoso.com" }
Uninstall nginx controller
To uninstall the controller run the following command:
helm uninstall ingress-nginx --namespace ingress-basic
5 - Key Vault
-
First create a secret named ExamplePassword in the key vault through the portal.
(You may have to give yourself permissions first.) -
Secondly deploy the key vault secret provider class
apiVersion: secrets-store.csi.x-k8s.io/v1 kind: SecretProviderClass metadata: name: storage-class-key-vault spec: provider: azure secretObjects: - secretName: test-secret # Name of secret within cluster data: - key: key objectName: ExamplePassword # Name of secret declared in objects properties below type: Opaque parameters: usePodIdentity: "false" useVMManagedIdentity: "true" # Set to true for using managed identity userAssignedIdentityID: <client_id> # Set the clientID of the user-assigned managed identity to use keyvaultName: <key-vault-name> # Set to the name of your key vault objects: | # Secrets to import from key vault array: - | objectName: ExamplePassword objectType: secret # object types: secret, key, or cert objectVersion: "" # [OPTIONAL] object versions, default to latest if empty tenantId: <tenant_id> # The tenant ID of the key vault -
Edit Pod Deployment by adding environment secrets or secret volume mount
apiVersion: v1 kind: Pod metadata: name: azure-files-pod-test labels: app: test-app spec: containers: - image: <azure-container-registry-name>.azurecr.io/nginx:v1 name: azure-files-pod-test ports: - containerPort: 80 protocol: TCP env: # Traditional secret mapping with environmant - name: SECRET valueFrom: secretKeyRef: name: test-secret key: key volumeMounts: - name: azure mountPath: /usr/share/nginx/html - name: secrets-store-inline # Map secrets trough file mounts mountPath: "/mnt/secrets-store" readOnly: true volumes: - name: secrets-store-inline csi: driver: secrets-store.csi.k8s.io readOnly: true volumeAttributes: secretProviderClass: storage-class-key-vault -
Validate Secrets mounted file share
To validate, once the pod is started, you should see the new mounted content at the volume path specified in your deployment yaml.# show secrets held in secrets-store kubectl exec azure-files-pod-test -- ls /mnt/secrets-store/ # print a test secret held in secrets-store kubectl exec azure-files-pod-test -- cat /mnt/secrets-store/ExamplePassword -
Validate Secrets Environment variable
# Login to pod
kubectl exec --stdin --tty azure-files-pod-test -- /bin/bash
echo $test-secret
6 - Load Balancer
Introduction
This document provides instructions on using Azure Load Balancers with your AKS cluster.
Load balancers can be managed trough kubernetes service deployments.
When you deploy a kubernetes Loadbalancer service, a public or private Azure load balancer is automatically created and managed by the AKS cluster.
Using the public load balancer
To create a public service of type LoadBalancer, copy the manifest below and paste it into a file named public-svc.yaml.
apiVersion: v1
kind: Service
metadata:
  name: public-svc
spec:
  type: LoadBalancer
  ports:
  - port: 80
  selector:
    app: public-app
Deploy the public service manifest using kubectl apply and specify the name of your YAML manifest.
kubectl apply -f public-svc.yaml
Using the private load balancer
To set up an internal load balancer, you can follow these steps:
- Create a service manifest file named
internal-lb.yaml. - In the service manifest, specify the service type as LoadBalancer.
- Add the azure-load-balancer-internal annotation to the manifest to indicate that it’s an internal load balancer.
Here’s an example of how to add the annotation to the manifest:
apiVersion: v1
kind: Service
metadata:
  name: internal-app
  annotations:
    service.beta.kubernetes.io/azure-load-balancer-internal: "true"
spec:
  type: LoadBalancer
  ports:
    - port: 80
  selector:
    app: internal-app
Deploy the internal load balancer using kubectl apply and specify the name of your YAML manifest.
kubectl apply -f internal-lb.yaml
After deploying the manifest, the AKS cluster will create a private azure loadbalancer
Restrict inbound traffic to specific IP ranges
The following manifest uses loadBalancerSourceRanges to specify a new IP range for inbound external traffic.
Here’s an example of how to add the annotation to the manifest:
apiVersion: v1
kind: Service
metadata:
  name: azure-vote-front
spec:
  type: LoadBalancer
  ports:
  - port: 80
  selector:
    app: azure-vote-front
  loadBalancerSourceRanges:
  - <IP_RANGE> # e.g. - 10.1.0.0/16
7 - Storage
How to use Azure File Shares for persistent storage
1. Create a storage class:
This storage class uses the azure csi provisioner. by default is has permissions within the aks resource groups.
The csi driver can be configured to use an existing storage account or to create one automatically. the same thing
applies to the file shares.
Retain File Shares:
To retain the file share when the Persistant Volume Claim (PVC) is released, set reclaimPolicy to Retain
Storage type:
Choose between Premium and Standard storage by changing the parameter skuName to Standard_LRS or Premium_LRS
Mount options:
Set share permissions, The default value for fileMode and dirMode is 0777
Set uid and gid to pod user if you experience permission difficulties. defaults to 0
Note: If a mount option is invalid, the PV mount fails.
Example Storage Class:
Note: this is an example which you will need to edit in order to make it work in your environment. One storage class represents one storage account.
kind: StorageClass
apiVersion: storage.k8s.io/v1
metadata:
  name: cmaas-storage
provisioner: file.csi.azure.com
reclaimPolicy: Retain
#disableDeleteRetentionPolicy: "true"  # disable DeleteRetentionPolicy for storage account created by driver
volumeBindingMode: Immediate
allowVolumeExpansion: true
mountOptions: # Configure mount options
  - dir_mode=0777 #0640
  - file_mode=0777 #0640
  - uid=0
  - gid=0
  - mfsymlinks
  - cache=strict # https://linux.die.net/man/8/mount.cifs
  - nosharesock # reduce probability of reconnect races
parameters:
  skuName: Standard_LRS # Premium_LRS
  #  resourceGroup: EXISTING_RESOURCE_GROUP_NAME  # optional, only set this when storage account is not in the same resource group as agent node
  storageAccount: <storage-account-name>  # Set correct account name
  shareName: <share-name> # if the share not exists it will be created
2. Create an Persistent Volume Claim
apiVersion: v1
kind: PersistentVolumeClaim
metadata:
  name: pvc-azurefile
spec:
  accessModes:
    - ReadWriteMany
  resources:
    requests:
      storage: 100Gi
  storageClassName: cmaas-storage
3. Configure Deployment
kind: Pod
apiVersion: v1
metadata:
  name: nginx
spec:
  containers:
    - image: <azure_container_registry_Name>.azurecr.io/nginx:v1
      name: azure-files-pod-test
      ports:
        - containerPort: 80
          protocol: TCP
      volumeMounts:
        - name: azure
          mountPath: /usr/share/nginx/html
  volumes:
    - name: azure
      persistentVolumeClaim:
        claimName: pvc-azurefile
How to use Azure Disks for persistent storage
You can create a StorageClass for additional needs using kubectl. The following example uses Premium Managed Disks and
specifies that the underlying Azure Disk should be retained when you delete the pod:
apiVersion: storage.k8s.io/v1
kind: StorageClass
metadata:
  name: managed-premium-retain
provisioner: disk.csi.azure.com
parameters:
  skuName: Premium_LRS
reclaimPolicy: Retain
volumeBindingMode: WaitForFirstConsumer
allowVolumeExpansion: true
Persistent volumes are 1:1 mapped to claims.
The following example YAML manifest shows a persistent volume claim that uses the managed-premium StorageClass and requests a Disk 5Gi in size:
apiVersion: v1
kind: PersistentVolumeClaim
metadata:
  name: azure-managed-disk
spec:
  accessModes:
    - ReadWriteOnce
  storageClassName: managed-premium-retain
  resources:
    requests:
      storage: 5Gi
The following example YAML manifest shows how the previous persistent volume claim can be used to mount a volume at * /mnt/azure*:
kind: Pod
apiVersion: v1
metadata:
  name: nginx
spec:
  containers:
    - image: <azure_container_registry_Name>.azurecr.io/nginx:v1
      name: azure-files-pod-test
      ports:
        - containerPort: 80
          protocol: TCP
      volumeMounts:
        - mountPath: "/mnt/azure"
          name: volume
  volumes:
    - name: volume
      persistentVolumeClaim:
        claimName: azure-managed-disk
Default Provisioner Reference
Use the kubectl get sc command to see the pre-created storage classes.
Builtin provisioners:
| Provisioner | Reason |
|---|---|
managed-csi |
Uses Azure StandardSSD locally redundant storage (LRS) to create a Managed Disk. The reclaim policy ensures that the underlying Azure Disk is deleted when the persistent volume that used it is deleted. The storage class also configures the persistent volumes to be expandable, you just need to edit the persistent volume claim with the new size. |
managed-csi-premium |
Uses Azure Premium locally redundant storage (LRS) to create a Managed Disk. The reclaim policy again ensures that the underlying Azure Disk is deleted when the persistent volume that used it is deleted. Similarly, this storage class allows for persistent volumes to be expanded. |
azurefile-csi |
Uses Azure Standard storage to create an Azure File Share. The reclaim policy ensures that the underlying Azure File Share is deleted when the persistent volume that used it is deleted. |
azurefile-csi-premium |
Uses Azure Premium storage to create an Azure File Share. The reclaim policy ensures that the underlying Azure File Share is deleted when the persistent volume that used it is deleted. |
azureblob-nfs-premium |
Uses Azure Premium storage to create an Azure Blob storage container and connect using the NFS v3 protocol. The reclaim policy ensures that the underlying Azure Blob storage container is deleted when the persistent volume that used it is deleted. |
azureblob-fuse-premium |
Uses Azure Premium storage to create an Azure Blob storage container and connect using BlobFuse. The reclaim policy ensures that the underlying Azure Blob storage container is deleted when the persistent volume that used it is deleted. |
Storage Types
| Sku Name |
|---|
| Premium_LRS |
| PremiumV2_LRS |
| Premium_ZRS |
| Standard_LRS |
| StandardSSD_LRS |
| StandardSSD_ZRS |
| UltraSSD_LRS |
To get more details about every sku option see: more info.